Showing posts with label Nail Art. Show all posts

Tuesday, June 29, 2010

a mecca night

Howdy!

So holidays have been far more busier than I imagined so apologies for the lack of blog action. I recently cashed in my $150 makeup lesson at Mecca Cosmetica (thanks Ying!). The makeup artist went through everything - from moisturisers, toners, primers & foundation to blush, highlights and shadows.

The look she showed me was a beautiful smokey plum eye using all Nars foundation, bronzer, blush highlighter and eyeshadows. 
Here's the face chart she drew me up (she used so many products!!):

Out of the $150 (plus a little extra), I purchased Nars Shear Glow foundation in Light 2, Stila smudge pot in Black and Nars multi-stick "The Multiple". These products really impressed me. 

Nars foundation costs AU$99 so it isn't something I'm going to be using all the time, but it glides onto the skin effortlessly and blends in incredibly. 

The smudge pot (AU$42) does NOT smudge AT ALL! It is called "smudge pot" because of its dual purpose for lining the eye and creating a smokey effect by smudging. The artist even used it on my upper waterline. 

And lastly, the Nars multi-stick (retailing at a hefty AU$89) is really pretty when blended into the skin (see below). The colour I purchased is called copacabana and can be used as a highlighter for cheeks, inner eye, brow bone and even lips! And you get a lot of product so I thought it was worth it ;) 

And here's the look:


And this is my outfit for the night including my new faux leather jacket from Living Doll & skirt from bardot.


Continuing with the black trend I went for a black and silver gradient nail with extra glitter dust applied to the tips. For those of you that haven't heard of Ulta3 (made famous through Vogue Aus Forums), they are an Australian polish with a considerably good formula for the price -> $2! Only a few chemists tend to stock them, so I was lucky to score this one. Can't wait to go back for more haha!

And the best part? Freebies! A part of the vogue promo, I scored a whole box of goodies including a mini Nars bronzer (so cute!) and Stila kitten eyeshadow!!
So all in all, I had a great night out. Off to watch Toy Story 3 tonight!


jenni&ying xo

Monday, June 7, 2010

Woodland Green FOTD and Gradient Nails

So I've been wanting to do a look somewhat inspired by the new Robin Hood movie by using greens and bronzes and this is what I came up with:

(Sorry the lighting and colours aren't very good in these shots)


Step-by-step process:

1. Prime eyes using Two Faced Shadow Insurance (a dot size cover entire lid)
2. Apply a light shimmery/metalic green eyeshadow on the inner half of the lid. Here I used "Sea Green" loose eyeshadow by Savvy (You can buy this at Priceline for about $7 it think; it's one of my favourites ^.^)
3. Use a bronze shadow on outer half of the lid and blend the two colours together. Here I used NYX "Golden".
4. Using a crease brush, take that bronze colour into and above your crease, keeping a sharp edge at the outer eye corner (at this stage you can cheat by applying some tape to get those perfect lines)
5. Bring the light green up to meet the crease colour and blend
6. Take a darker green and, using a flat brush, apply to the bottom outer half of your lash line. At the outer corner, blend this with the bronze colour. I'm using NYX "Kiwi".
6. Use a fine brush and gel eyeliner to tightly line your top lash line and flick the liner out following the sharp edge you created in step 4. I'm using Inglot's gel eyeliner in black.
7. With the remaining liner on your brush, lightly go over the bottom lash line, stopping half way.
8. To brighten your eyes, add a dot of white shadow in the inner corner and blend. Line your bottom waterline with a white eye pencil.
9. Curl you lashes and apply a generous coat of mascara

You're Done!

For the rest of my face, I just used NYX "Natural" blush applied with a stippling brush and NYX "Rose" Lipstick.

I personally love green eyeshadow and it saddens me just a little every time someone says blue eyes don't match :( But I think this is a nice subtle green look anyone can pull off.

Onto another recent nail art experimentation of mine: gradient nails! Some colour combinations can look stunning when done right. I went for a pink combo and this is what I came up with:


You might not be able to tell, but I've used three colours: OPI "Princesses Rule!" as the base and top coat, OPI "Lunch at the Dehli" in the middle and OPI "Koala Berry" at the tip.

It's super easy to do - I just used a makeup sponge to apply the layers of polish and voila!


And I got my Cherry Culture goodies I bought during the NYX sale today. I haven't forgotten about my original CC haul, don't worry. After exams, I'll pull out all my NYX treasures and swatch and review them all as promised :)


First exam tomorrow :S

jenni&ying xo

Wednesday, May 12, 2010

nail art update

Jenni here and uni is all stress stress stress! Solution? Time out and nail art obviously.

Nothing brightens me up more (well, almost nothing) than to look down at sparkling pretty nails :) Here is a few NOTDs I've done in the past couple of weeks.

I wore this to the Smashbox event. It is a simple pink french using OPI A Dozen Rosas as the base and OPI Pink Flemenco on the tip. No guides needed for this one: just start from the side of the nail and sweep a curve to the middle of the nail tip. Finish with a line of glitter to mask those wonky lines!


Here is the plain swatch for A Dozen Rosas. Its a creamy dusty pink.


Flowers! Never tried this before, but they are surprisingly easy to pull off. Just dot five white dots in a circle without them touching. Drag a toothpick or dotting tool from the middle of a dot to the centre of the circle. Finish by adding a pink dimonte to the middle of the flower. Here I've used OPI Cozu Melted In The Sun as the base.


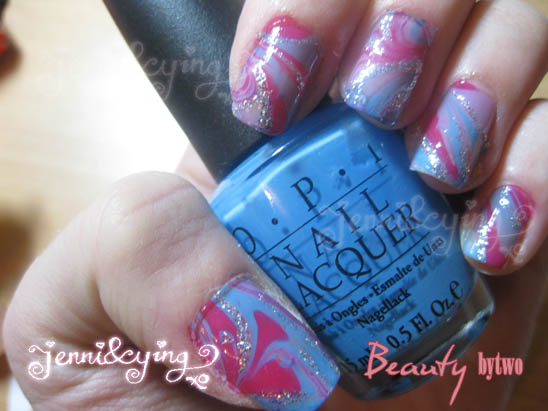
Marble art has always fascinated me and this is my very first try. It's a little more difficult than it looks and takes a lot of patience. 


♥ To do, get a cup of water (preferably a disposable one, or an old glass jar) and drip a drop of polish of a desired colour into the cup. It should spread out to the size of the cup. 
♥ Drip a second colour into the cup and repeat this process until you get what looks like a bulls eye. 
♥ Drag a toothpick or dotting tool through the polish to make a pretty pattern. 
♥ Use sticky tape to cover the bare skin around your nail. 
♥ Dip nail into the cup and keep it emersed in water while gathering excess polish up with a stick. 
♥ Lift nail up, remove tape and clean edges with nail polish remover. 
♥ Finish by adding glitter lines to the design and use a top coat.

This is something that you can't touch up so it's nice for a special event (or to show of to fellow bloggers :P)

The colours I used are OPI Koala Berry, OPI Do You Lilac It? and OPI No Room For The Blues:


Well hope you liked that :) 

Hope everyone had a lovely mothers' day!


Till next time,


jenni&ying xo